Thursday, December 29, 2011

Hassleback Potato


Hassleback Potato (trial)
(12.29.11)
Saw these bad boys and had to give them a try. 
Here's what I did and what I thought...

Step 1:
Wash your dirty tater.

Step 2:
Preheat your oven to 425 and put your tater on a cutting board. 

Step 3:
Starting from one end of the tater and cut ALMOST through the entire thing.  I sliced mine in about 1/8" slices.  I got all the way to the opposite end and sliced it off...  Win some, lose some.

Step 4:
Mince some fresh garlic and wedge it in between each slice.  This part is annoying.  I also put a little "I Can't Believe It's Not Butter" in between each one.

Step 5: (Totally Optional... Totally Worth It)
Hold your tater in your hand and rub the bottom and sides with your "Not Butter".  Roll it in rock salt or sea salt and place it on your pan.

Step 6:
Drizzle with olive oil and cracked pepper and bake for 45-50 mins.  The edges look crispy and the fresh is soft.


Ta Da!

My Thoughts:
Well first of all they smell and look delicious.  You still have to eat them with a fork and knife because you'll get oil and butter all over your fingers.  I liked them but I'd enjoy a twice-baked potato more.  The slicing and stuffing was tedious.  Not my favorite tater but not too bad. 

I'lll say ...
3 out of 5

Be sure to post any questions/comments/recommendations under the main post on the Home page!

0 comments:

Tuesday, December 27, 2011

Button Hairpins


DIY Button Hairpins
(12.27.11)

I found these hairpins on Pinterest and made some for Nikki.  The ones I’m going to link to are actually attached in individual bobby pins and stitched on.  I did mine a little differently because I wanted them to be more durable.
I used silver hair pins instead of bobby pins.  I found them on clearance at Walmart.  I traced each button on felt, cut it out, placed two parallel slits in the center of the felt circle, and fed the top of the pin through it.  A little hot glue on the felt… stuck the button on and that’s it.
If you do it this way the buttons are not attached to the pin, the pin/felt/button are all attached together. 
If you’ve tried this or have any comments/suggestions, let me know.
R~<3

0 comments:

Friday, December 23, 2011

DIY Envelopes

Decorative Printable Paper & Folding Instructions
Details on my "DIY" page.

0 comments:

Easy Shredded Gift Packing


Easy Shredded Gift Packing
(12.23.11)

So you have a gift to give someone and when you put in the box or giftbag, or whatever, it looks puny and sad.  But it's dumb to run to walmart or the craft store, fight the traffic, stand in line, and spend $3 on a bag of shredded lettuce paper.

So... DIY

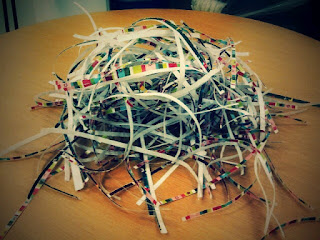
I searched the internet for free, printable scrapbook paper.  When I found what I wanted I printed out about 12 sheets (we used Christmas ones), and put it in the paper shredded here at the office.  Granted I understand not everybody has a paper shredder at home... so I can't really help everybody here.  But for those of you who have access to/work in an office this is a quick and easy way to turn this:


into this:
And then into this:

Happy Packing!
R~<3

0 comments:

Decorative Envelopes & Tags


Decorative Envelopes & Tags
(12.23.11)

These are super handy and easy.  Ashley and I wanted to make some envelopes for Christmas presents.  There IS something inside... it's not just the envelope.

First I found some online, printable scrapbook paper.  There is a lot and I used the same designs that I used yesterday for the shredded gift packing.  Now one thing I DO recommend is using a thicker paper in your printer, if you have it.  We used our manager's fancy paper so the envelopes have a little more weight to them.  Fancy first.

So print your scrapbook paper (however many envelopes you'll need - one piece per envelope).  After that, reload your paper and print this envelope template on the backside.  You can also print one template on a thicker piece of paper, cut it out, and use it to trace around.  Whichever option you choose, you'll end up with this:

Flip your paper over to the white side.  Each flap will fold inward and eventually be glued.  I had Ashley help me with this one so I could take the picture.  I think it works best, and gives you nice crisp lines, if you use a ruler (or something straight) to fold all four flaps against... like this:
** NOTE **
This step will only work if your hands are incredibly tan

Once you have nice creases fold the flaps in flat and run your finger along each fold to make them sharp and ready to glue.  The two smaller side-flaps will fold in first and the large, bottom flap will fold up over them. 

Use a glue stick on the side flaps, hold each in and fold the bottom flap up.  You really only want to use a glue stick to do this otherwise your envelopes will look lumpy.  DIY is great... but not when it looks like garbage.

You should end up with something pretty... like this:

That's pretty much it!  Stuff em and use a small amount of glue from your gluestick to seal your envelope.  You can also seal it with stickers...wax...magic... whatever works for ya. 

We also printed labels and cut them out and glued them on the front of our envelopes.  This whole project cost absolutely nothing, they look professional, and they're cute.  You can get as creative as you want... pick your paper, pick your labels.  You could even use store-bought scrapbooking paper or construction paper, etc.


Keep it classy and Happy Frickin' Christmasauce!
R~<3

0 comments:

Poor Man's Toffee


Poor Man's Toffee

Alright boys and girls.... I don't know if you have ever heard of/had Poor Man's Toffee before but Ashley, her mom & I had a little holiday cookie get-together the other night and this is what we made.  I was super excited because I haven't had it in years.  The first time was when I worked for Chanel and my manager made me a batch... ok, she made a batch for the department but I ate it all, get off my back. 

I decided to share it BECAUSE it's not only the best chocolately/salty snack but it's inexpensive to make, makes a good amount considering how rich it is, and can make an easy gift for those people in your life that seem... what's the word... ungiftable.  I considered myself ungiftable - I love to give presents but nobody ever knows what to give me. 

Enjoy
----------------------------------------------------
POOR MAN'S TOFFEE
- 1 sleeves of Saltines.  (THEY HAVE TO HAVE SALT! This is a treat, not a healthy snack)
- 2 sticks (1c) REAL butter
- 1c Sugar
- 1 bag of semi-sweet or milk chocolate chips (We used milk chocolate bc semi-sweet tastes like feet)
- 1c chopped hazelnuts

Step 1
Line an edged cookie sheet with aluminum foil.  Make sure the foil covers all four edges & really press it into the corners and along the bottom creases of the pan - it helps your Saltines lay flat.  Lightly spray the alunimum foil with cooking spray & line the bottom of the pan, edge to edge, with a SINGLE layer of Saltines, salt-side up.
*OCDism - Obviously not every cookie sheet will allow you to have your Saltines line up perfectly edge to edge.  Because I felt like I had to, I actually cut a row of crackers by gently sawing back and forth across the tops with a butter knife.  You can see in the picture this gave me a totally covered bottom. *snicker

Step 2
Melt your butter on low-medium heat until you have a nice butter soup.  Mix in your sugar and let it totally dissolve.  Bring the mixture up to a boil for 5 minutes, stirring constantly.  Make sure not to turn your heat too high or you'll burn your butter.  It stinks & tastes bad.  This mixture get's fairly thick and bubbly... imagine a sugary-butter custard.  If it looks like butter pudding, you've done a great job.
Step 3
Pour your sugary-butter custard over your crackers & give it a good spread.  Do it up - edge to edge & cover those crackers.
Step 4
Pop this bad boy in a 300 degree oven for 15 minutes.  The butter mixture will seep down into the crackers & bubble up on top.  It's really, super hot so try not to stick your face in it...  I know it looks delicious but self-control can really come in handy here.  Place it on a flat surface - I prefer to use two large, cork trivets for this as opposed to trying to balance it across the oven burners.
Step 5
Pour the chocolate chips evenly across your candy while it is very hot.  They will immediately start to melt & you won't need to put it in the oven again.  Once you have covered the top with chocolate, carefully spread the melting-chips until it is a smooth layer of chocolate.
Step 6
Sprinkle the chopped hazelnuts across the top of your chocolate.  Use as little or as much as you'd like but 3/4-1c seems to do the trick.  Once covered in nuts, cool your pan in the refrigerator until it is TOTALLY cool.  Don't try to handle your toffee while it is warm.  Trust me on this - you'll just make a mess.
Step 7
Once your pan is cool you can go about breaking up the toffee by slicing it into squares or by lifting up one edge and breaking it with your hands.  I personally prefer breaking it because I think the irregular pieces look better...  more like toffee bark as opposed to Saltine Brownies.  Who knows... another OCDism?  Place your pieces into a tin lined in wax paper. 

DO NOT PUT IT IN A PLASTIC BAG!  Plastic bags hold in moisture and you'll end up with a sack full of soft... icky....  well, I think soft & icky about cover it.  You want these to be crunchy.

Step 8
Enjoy your Nom!  I mean it.  Let me know if you give it a try & what you think.  There is also a version with white chocolate & crushed peppermint that sounds pretty naughty.

Happy Holidays!

0 comments:

Thursday, December 22, 2011

Last Minute Gift-Packing

DIY Decorative Packing Material

Ever felt like buying those packages of shredded/crumpled paper are a waste?  What if you run out last minute??  Simple, but came in pretty handy for Ash and I this year.

Check it out on the "DIY" page.

0 comments:

Thursday, December 15, 2011

Happy Christmas?

Playin' Scrooge
On "Thinkin" page

0 comments:

Friday, December 9, 2011

Love & High Expectations

What a year this has been.  Now that it's almost Christmas time (which I cannot believe) I get that annoying, "reflective" headscape going.  2011 has been rocky for a lot of reasons.  I hope that through it all though, everybody has taken something positive away from it all - whatever YOUR situation.

I came to the realization this year that we all have to work.  Life isn't a dress rehearsal.  Life is what you make it.  Alright, seriously, enough with the cliches.  What I'm trying to say is that if you go to work, hate your job, come home, hate your house, go to work, come home, go to work, come home...  That's just passing the time.  What are we all waiting for, you know?  I realized that no matter what career path I choose, I have to be able to creatively express myself.  Without that, I feel entirely too average.... And when I feel average, I look it. aka NOT ok.

I started a business at the end of last year.  It was a Telecommunications Marketing business, triangle-esque.  It did harm, it did good, but I realized that I'm not a suit.  I'm not a conventions kinda guy.  I don't want to give up on the people I care about simply because they chose not to follow the same pipe dream.  Goodluck to anybody who can actually make money doing it, but I'm simply not made to be Avon Lady of sorts.

I currently have a job that I'm looking to change.  There is a lot of downtime here everyday which allows us to plump our Pinterests, Share on Facebook, creep on dating websites, AND actually focus on what we need to do to feel happy.  I refound my art.

I love to read, write poetry, try new makeup trends, take and edit photos, create, do-it-myself.  It keeps me in better spirits.  It keeps me from feeling like a gear in a factory.

This blog is my random brain.  I'm not sure what all I'll put on here yet but...  hopefully somebody gets some kind of enjoyement from reading it

R ~<3

0 comments:

Friday, March 4, 2011

Have you ever had your heart broken? Have you ever broken a heart?

Have you ever had your heart broken? Have you ever broken a heart?
4 times.  I've had 4 serious relationships with 4 good guys, and slowly drove 3/4 crazy lol.  I have a bad habit of not knowing what I have until I don't have it anymore.  I'll say I've broken their hearts also. 

I think relationships are difficult because you really never know a person until you start stripping away the "show".  It's not easy... learning things you don't want to know, and sharing things you don't want anyone else to know.  They always come back.  They will always be used against you.

Sometimes, keeping certain things a secret is a good idea.

...  I don't think a broken heart ever fully heals.  It's better than it doesn't.  We all have SOMEONE... when you think about him/her it makes ur chest ache.  For 10 seconds you whip thru the relationship, beginning to end, the good and bad, and terrible, and everything in between.  For 10 seconds you wonder why you still care, remember why you do, and remember why you shouldn't.  For 10 seconds you could almost let your eyes tear up but then think better of it; you've done that enough already.

Everybody should love and lose at least once before you find "the one".  It's good to know how it feels to lose what you've built your life around.  Otherwise, we'd just go around with a phony expectation that there's always someone else, someone better, someone more suited. 

There IS always someone else, but not necessarily better.  New = Better is for cell phones, and cars - not your partner.  One of my mentors, George Zalucki says "If you want to feel love, become love."

Love the one you're with.  Just give them all you have.  If it doesn't work out, you'll know in your heart and mind that you tried as hard as you could.  There IS a comfort in that.

0 comments: